[headline style=”17″ align=”center” headline_tag=”h2″]
Shots In Studio
[/headline]
Welcome back to part 2 of this article. In part 1 we talked about the basic equipment that you will need to get started with Home Studio Music Production. So now that you are interested or already have the equipment that’s needed to get started, you will want to learn how to plan your home recording studio setup.
Are you setting up in a small room on the first floor, upstairs, or in a basement?
Regardless of what room you are setting up your home studio, 4 things that you must do are:
- Find the best sounding side of the room
- Set up your desk in the middle of parallel walls, not in the corner.
- Set up your speakers correctly in the monitoring position.
- Acoustically treat your walls
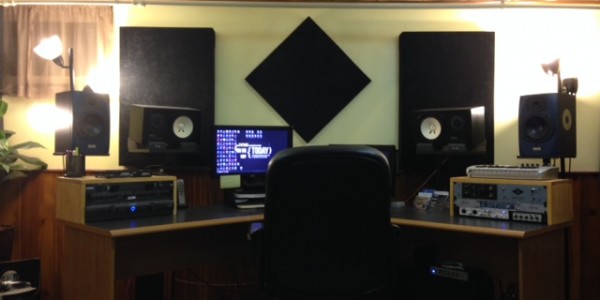
This is exactly how we did it for The Shots In Order Debut CD Release. This significantly improved the mixing and mastering process for the album, letting you hear more of whats coming out of the speakers rather than the blended sound of whats bouncing off the walls. Furthermore, keeping a nice organized studio, but yet still maintaining a vibe to the room can help tremendously.
[bullet_block style=”size-16″ small_icon=”1.png” width=”” alignment=”center”]
- FIND THE BEST SOUNDING SIDE OF THE ROOM
For me, I set up my home studio in the basement. The first thing I did was set it up where there was room to fit my desk. That ended up being a mistake because I realized that my basement sounded better on the other side of the room. So I rearranged it, and my studio sounded much better.
[/bullet_block]
[bullet_block style=”size-16″ small_icon=”1.png” width=”” alignment=”center”]
- SET UP YOUR DESK IN THE MIDDLE OF PARALLEL WALLS
The worst thing that you can do is set up your studio desk in a corner!! Bass frequencies are notorious for building up in corners and you will never get an accurate representation of what your mix is really sounding like. Try to stay out of the corners if you can.[/bullet_block]
[bullet_block style=”size-16″ small_icon=”1.png” width=”” alignment=”center”]
- SET UP YOUR SPEAKERS CORRECTLY IN THE MONITORING POSITION
Your speakers should be the same distance from the side walls, the same distance apart from one another, and the distance apart from one another should be the same distance as where you are listening and sitting at the desk. Get a measuring tape out, get it right, and you will be pleased.[/bullet_block]
[bullet_block style=”size-16″ small_icon=”1.png” width=”” alignment=”center”]
- ACOUSTICALLY TREAT YOUR WALLS
If you’re going to start anywhere, start with the area around your desk. You will want absorption behind the speakers, absorption at the first reflections of side walls, and bass traps in the corners. I am using 4 auralex bass traps in the corners of my studio, and I also built 4 panels with Owens Corning rigid fiberglass 703 for the side walls and behind the speakers. Don’t forget to also use some absorption under your speakers.[/bullet_block]

